OT2Go->Marks User Guide
| Table of Contents | |
|---|---|
| Overview | basic terminology and how things work |
| App Tabs | description of top level tab options |
| App Menus | description of top level menu options |
| Premium Features | enhancements to app functionality |
| Getting Started | how to setup a user configuration |
| Marks | flick and pick marks |
| Shot Angle | determine angle to target |
| User Records | maintaining user records |
| Configure Sight | modify the sight component |
| Configure Arrow | modify the arrow component |
| Calibrate Marks | set marks and calculate velocity |
| Calibrate Angle | initialize device angle sensor |
| Store | premium feature purchase and restore |
| About | app and database information |
| MM+CC VS MM+D | counting click versus dial numbers |
| Velocity From Marks | calculate velocity from shot in marks |
| Anchor Range | what it is and how to use it |
Overview
What follows is the terminology and language used to describe OnTarget2Go! Marks (OT2Go->Marks) app functionality. The item in bold is the name of the feature or convention, and the explaination or definition following.
Screen: the entire, currently visible, work area of the application.
Navbar: a single row at the Screen top edge when the user has clicked to the Config, Store, or About screens. A back arrow is displayed at the left edge of the Navbar. The back arrow goes back one level of displayable screens.
Toolbar: a row of icons at the lower edge of the app screen that have menu functionality exposed for quick, single click access. The Toolbar also contains the currently loaded user record.
Tab Buttons: along the top edge of the Screen. Clicking a Tab Button loads the associated view and work area. Tab options are Marks and Shot Angle.
View: the work area of a screen that contains multiple input fields. A title and description of the input is on the left and the data entry field is on the right. A view can be "flickable". If the view has a green bar at its lower edge, that means more to display or that the view can be "flicked". If the view has been flicked and has reached the last displayable field, a red bar appears.
Check Boxes: app options, of which one or more, none, or all may be "selected"; the check boxes are small boxes, when selected they have a"check mark" in them. If a check box is associated with edit fields, then, when checked, the fields unlock. Unchecking locks the edit fields. Lockable edit fields have a red border when locked and a green border when input or changes are allowed.
Edit Field: the area of a view that allows data entry and changes in the form of numbers or letters. A title and description of the input is on the left and the data entry field is on the right. If the user enter a value out of range of the field, the app will display the min or max of the input field. An edit field has a white background.
Button: a control that causes the app to execute some function or operation. They usually have a descriptive wording or symbol on their face to denote their function.
Calculation Field: a field about the size of an edit field, but light blue in color; the color makes the field easily discernable from other field types. Light blue means that the app does a calculation or loads data for you. You may not edit a calculation field.
Spinner: a group of two buttons, one with an "up arrow" and one with a "down arrow" on their face. They are usually located next to an edit field and, when clicked, change the edit field value a predetermined amount up or down. Spinners do not allow manual editing of the value they contain.
Combo Box(or List Box): looks like a button with a text description or a Navbar with a right arrow. Clicking on the ComboBox allows selection of an item contained in a drop down or list.
Data Sheet: a chart or grid that displays associated app values, data, or records.
Scroll Bar: attached to the rightside (or bottom) of a data sheet; It has a drag handle (if the OS has that feature), and that will cause the attached data sheet to scroll or expose new data.
Dialog and Message Box: something the app loads and displays as a result of user input or a app error.
Premium Features: options that may be purchased to enhance app function.
App Tabs
The main screen has two options: Marks and Shot Angle. The options are located at the top of the screen.
Marks This main view contains options and results related to calculating a trajectory and establishing a marks list based on the user configuration currently loaded.
Shot Angle This main view contains a through the lens viewport to bracket a target and determine an angle to it.
Getting Started
Pretty simple really. Visit the various manufacturer websites to find your equipment information. Select the Config button in the Toolbar. Then select Config Sight and Config Arrow; entering your data into each view. Once you've gotten to the point that you would not want to re-type or start over, save your information in a user record. Select Config on the toolbar, then select User Record from the list. Name the user record something that is recognizable but not so specific that changing a component invalidates the name. Your saved user record can now be restored any time you need it. You're now ready to visit the other views and start playing the various app features. Click a tab button to visit Marks or Shot Angle and you'll have a new app view. You'll need to calibrate the angle sensor prior to trying the Shot Angle feature. NOTE: saving a user record is a Premium Feature.
Possibly the two most important measurements you'll need to record for the purposes of making sight marks are Peep Height and Sight Radius. (See the discussion on how these measurements are taken in the Config Sight section below).
Peep Height and Sight Radius measurements should be as accurate as you are capable of measuring. Peep Height is measured from the centerline of the peep to the centerline of the arrow shaft. Sight Radius is measured from the center line of the peep to the plane of the scope lense or pin(s). Both measurements must be taken while at full draw.

How To Measure
Peep Height and Sight Radius
After the peep height and sight radius measurements, arrow components are the next most important data you'll need. The data you enter about your arrow will provide the app with information to make its drag model.
To get the most accurate marks, you need an accurate velocity. Velocity calculations are done on the Calibrate Marks view. To calculate velocity from sight marks, you'll need two or three shot-in marks; a sight-in distances with a scale mark for each. You can use as few as two marks. Using three marks and enabling the "cross check" feature, allows you to double check your marks. The velocities calculated by the app should be fairly consistent and not vary by a large amount. A large variance means a possible "bad mark".
When entering or modifying data in the edit fields, you might run into the situation that you enter some value and find that the app resets it to something else. This is the app's data validation at work. Each edit field is range checked to insure that you are not entering something that will cause an error condition. If you run across a field that you don't think you'll need, leave it at the default setting. Every effort has been made to make the program as bullet-proof as possible in regards to data errors, but don't go zeroing out a field (or inserting " "s) just because you think you don't need it. Once you make all your initial selections and changes, save your user record.
Marks View
NOTE: accessing the Marks List Tap is a Premium Feature.
This main view contains options and results related to trajectory calculations and generating a marks list.
There are only two edit fields on this view Target Range and Angle To Target. Both may be manually changed by the user using keypad input.
Keep in mind marked distance shoots give the visual distance to the target not the level or angle compensated distance. Also, where you stand relative to the stake might give you a fractional distance to target different from the stake distance.
To manually change the Target Range field, click or tap to open the keypad. Enter the shot distance and the Mark+Click field will change to reflect your sight setting. You can enter a decimal fractional distance and the app will calculate and show the in-between sight setting for the distance not shown in the mark list.
To manually change the Angle To Target field, click or tap to open the keypad. Enter the angle to target and the Mark+Click field will change to reflect your sight setting. You can enter a decimal fractional angle.
NOTE: if you manually set the Target Range using an angle compensating range finder, it is giving you the "level" distance to the target. So, you would use the Level Setting, not the Cut Setting for your sight Mark+Clicks
Alternately, there are premium features to automate finding the correct sight mark. For Target Range, simply click or tap the marks list datasheet row containing the distance of interest. The Angle To Target may be set using the Shot Angle tab and "Apply"ing the angle the device dermines to import the angle.
Shot Angle View
NOTE: accessing the Quick Change tab is a Premium Feature.
The Shot Angle view is a convenience feature. The user can use the view to determine an angle to the target and generate an angle cut from the angle.
Prior to using this feature, the user must calibrate the app to the device hardware. This must be done each time the app is started up.
Click or tap the Shot Angle tab to change the angle finding mode. The app uses the device camera for a visual viewport. A red square is displayed in the center of the viewport and allows the user to accurately bracket the target. Pressing the Capture button locks the algle to target. Press the Apply button to send the angle to the Marks view. Press the Release button to unlock the angle and find another angle.
NOTE: Each time the Capture button is pressed, a target picture is acquired and saved. It is up to the user to remove the archived pictures.
User Records View
NOTE: saving a user record is a Premium Feature.
The User Record view allows for basic file load, save, and delete functions. Renaminig to be added in a future release. The user records are maintained in the device local storage, so they are not a restorable item.
This was mentioned in the Getting Started section, but bears repeating. Once you've gotten to the point in creating a configuration where you would not want to re-type or start over with the data entry process, save your information in a user record.
There are three buttons on this view: Load UR, Save UR, and Delete UR. Their function should be self explanatory. The Load UR button loads a saved user record. The Save UR button saves the current configuration in the app. The Delete UR button permanently removes the selected user record from device storage.
When you purchase a "save", you can load and save over the record as many times as you like. Deleting a saved user record deletes the physical record from the device. When you delete a record, the save count is not incremented. It
does not add back a "save" to the available save count when you delete.
The only time the saved records disappear is when you delete them, when you do an uninstall of the app, or when you wipe your device and switch to a new phone/device. The user record data resides in the device storage..not on
the servers maintained at Google or Apple..so once deleted they're gone. Deleted user records can't be restored with the Restore button because they are considered "consumable" in-app purchases..like a game
"power-up".
Config Sight View
This view allows the user to configure their sight. Everything you need to know about your sight should be available from the manufacturer website or in the product info pamphlet supplied with the sight.
Picking a Sight Type from the combobox will set the Track Adjust, Clicks Per Mark, and Click Value fields based on your selection. If you don't see your sight type, you can select Custom and set the values yourself.
Even if you select a sight type and let the app set the edit fields, you can always change or adjust the values later. After making changes, select the Custom choice for Sight Type so you remember the values are "non-standard".
Measure and set the Peep Height and Sight Radius edit fields with the measurements you took earlier following the instructions in the Getting Started section.
Save your configuration in a user record.
Config Arrow View
This view allows the user to configure their arrow. The importance of data entered here is multi-faceted; it helps to define a drag model for use in trajectory calculations and in making sight tapes, as well as calculating everything arrow related: KE, MO, GPI, FOC, velocity, and dynamic spine.
NOTE: Don't forget this is a flickable view.
Shaft Length is the measured length of the shaft material only. Shaft Length is the measured length of the shaft material only. Shaft Length is the measured length of the shaft material only. That was not a misprint..it was repeated because of its importance. Do not confuse shaft length with AMO arrow length. AMO arrow length is not used by Pinwheel Software products. If you do use AMO complete arrow length in place of shaft length, you will cause the program to make incorrect calculations. Inputting the incorrect shaft material length will result in errors in the total arrow weight calculated, so you'll induce weight/mass related errors into the trajectory calculations.
The weight of shafts in grains per inch can be found in manufacturers published specs; ususaly on their websites or catalogs. The specifications may change between model years or, in some cases, from batch to batch as shafts are manufactured. Some manufacturers label the shafts or packaging with letter sequences or weight ranges. This is done so you can re-order the same weight sequence.
The Shaft GPI edit field may be changed to reflect the actual shaft weight in grains per inch versus what is published. If the app calculated total arrow weight (TAW) is off by more than three to five grains from what has been measured with a grain scale, this would be a logical first place to look to determine the cause. Check manufacturer websites for current weight information.
Manufacturers provide nock and fletching data on their websites. Another good source of this info is catalogs like the one from Lancaster Archery Supply. The data is generally accurate, but variations in production runs can cause differences in weights. Usually the variation between runs is less than 1 grain. Color can also influence the weight of nocks and vanes, but usually only minor amounts (~0.1-0.2 grains). The larger the vane the more the color will affect the weight.
For Arrow Wrap weights, it's best to visit a manufacturer website or e-mail/call them. The weight really depends on the wrap size in square inches. Not to be confused with a per inch weight. Wraps come in multiple widths and lengths. Different widths support different shaft ODs; a 27xx uses a wider wrap than a 19xx shaft. One website lists normal wraps as ~1.1grs per sq/in, reflective wraps as ~1.6grs per sq/in. Colored Ink makes a wrap heavier. A solid color will probably weigh more than a wrap with a design or picture.
If you use an adjustable point weight system, like those offered by PDP, Gold Tip, Easton, Black Eagle, or TopHat, add the additional weight to the Point Insert Weight field.
Fletch Offset is a key component in calculating the drag of a complete arrow. A default setting of 2.0 is considered normal. For helical, this value may be increased toward the max value of 5.0, as required. The value can have a significant effect on sight marks, especially at longer ranges. Changes to this field can be made if there is a noticeable variance in mid-range marks. If mid-range marks are "hot", increase this value to correct. When calculating a velocity from sight marks or pin gaps on the Config Sight view, increasing the offset value will raise the calculated velocity, while decreasing it will have the opposite effect.
Calibrate Marks View
This view allows the user to enter multiple shot-in marks, calculate a velocity from those marks, and set the anchor range.
NOTE: Don't forget this is a flickable view. Flicking will expose the Anchor Range and Anchor Marks edit fields.
There are three Range and Mark+Click pairs: Near, Mid, and Far, along with one for the Anchor information. Each pair has a edit field for range and the associated mark+click for the manufacturer scale.
Generally, using two marks or gaps around the mid-point of your planned shooting distances give the best results. If you use three marks, a one that is not perfect will show as a variance in the velocity calculation. More than a couple of FPS difference from other velocity results indicates a possible questionable mark or distance. You can eliminate it from the calculation by unchecking its selection checkbox and recalculating.
You've collected two or three shot in marks, so enter the data in the edit fields that you deem appropriate. Check the calculation pair option(s) you want to use to determine velocity. Checking a selection will replace the Near-Mid, Near-Far, Mid-Far labels with the ranges you've entered in the edit fields.
Checking a box tells the app you want to use a calculation pair to determine velocity. Unchecking tells the app to ignore the associated pair. If you've selected more than one pair to use, the first checked pair will be used for your velocity unless you check the Average checkbox option. Selecting average will create and use the average velocity calculated from your checked pairs.
Clicking or tapping the Calculate button "shoots" an arrow based on the configuration data you entered on the Sight and Arrow Config views and the app matches a trajectory to your entered and checked range and mark+click pairs. The more data points you use, the more accurate the calculation can be. The resulting velocities are displayed in the calculation fields. Once you're happy with the results, click or tap the Apply button to send the velocity and marks list to the views that use them. Follow the Velocity From Marks link for a more detailed discussion.
Calibrate Angle View
This view allows the user to set or reset the device accelerometer or angle measuring hardware..
The app needs to calibrate itself to the device accelerometer each time it is started.

Leveling Devices
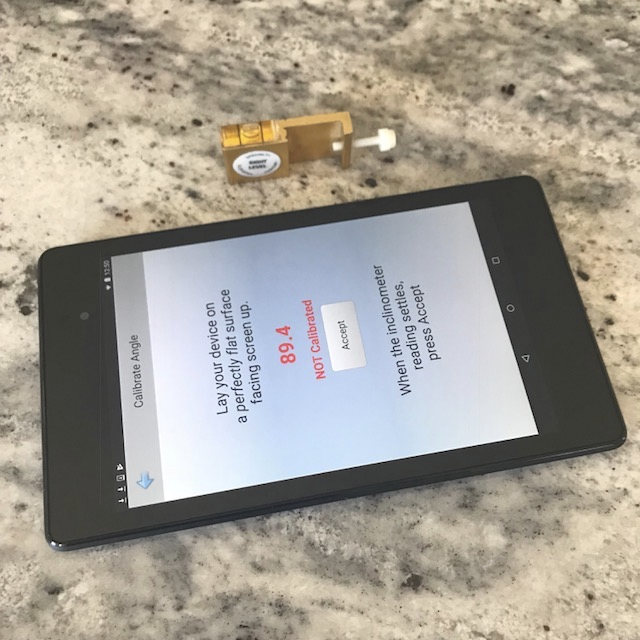
Calibrating The App
Lay the device on a perfectly flat surface. Kitchen counter tops are generally level but it is always a good idea to verify with a carpenter level, string level, or other level inticator. Allow the angle readout to settle, then click or tap the Accept button.
The app will finish calibrating itself and back out to the Application Setup view when finished. You're now free top use the Shot Angle view.
Store View
The button to enter the app view for purchasing Premium Features is in the lower right corner in the toolbar and looks like a shopping basket. When there is something available for purchase it's visible.
In order to make a purchase, select the item from the purchase option list by clicking or tapping. When the Purchase button is high-lighted and activated, click or tap the button to complete the purchase.
If you uninstall the app, reset your device, or switch to a new device, you can click or tap the Restore button. The non consumable purchases will be restored.
NOTE: when you restore purchases, user record saves are not restored.
About View
The button to enter the app About view is in the lower right corner in the toolbar and looks like a circle containing an "i". This view contains info for contacting Pinwheel Software and premium features try-it status.
Contact info is in the form of an e-mail address. The Pinwheel website also has contact forms, e-mail, and telephone number info.
The area displaying Try-It status shows try-it counts for each premium feature. Each try-it has a usage count associated with it. As you try the feature, a counter is decremented. This allows the user to try a feature before buying. When a premium feature has been purchased, this is also indicated.
Mark+Click or MM+CC Versus Mark+Dial (MM+D)
If you use the vintage AA method..MM.D where MM in the mark and D is the vertical adjust knob number reading. IE..you zero the knob..then slide the sight to the MM mark..then click to the decimal D value on the vertical knob..DON'T. The accuracy of this method is literally hit-or-miss. It totally depends on two things that are of equal importance; one: the sight's ability to accurately drop into the screw threads at the zero spot exactly at center of the "mark" after the sliding motion AND two: your ability to actually see where the exact center of a given mark is.
The sight might not seat in the threads after the slide and will only fully engage the screw drive after a click or two or by clicking the vertical knob forward and back. This might seat exactly on the mark center or it might seat 1 click plus or 1 click minus the drop in point. If you're unlucky and the sight seats to the minus side, you can be off 2 clicks before you even touch the vertical knob.
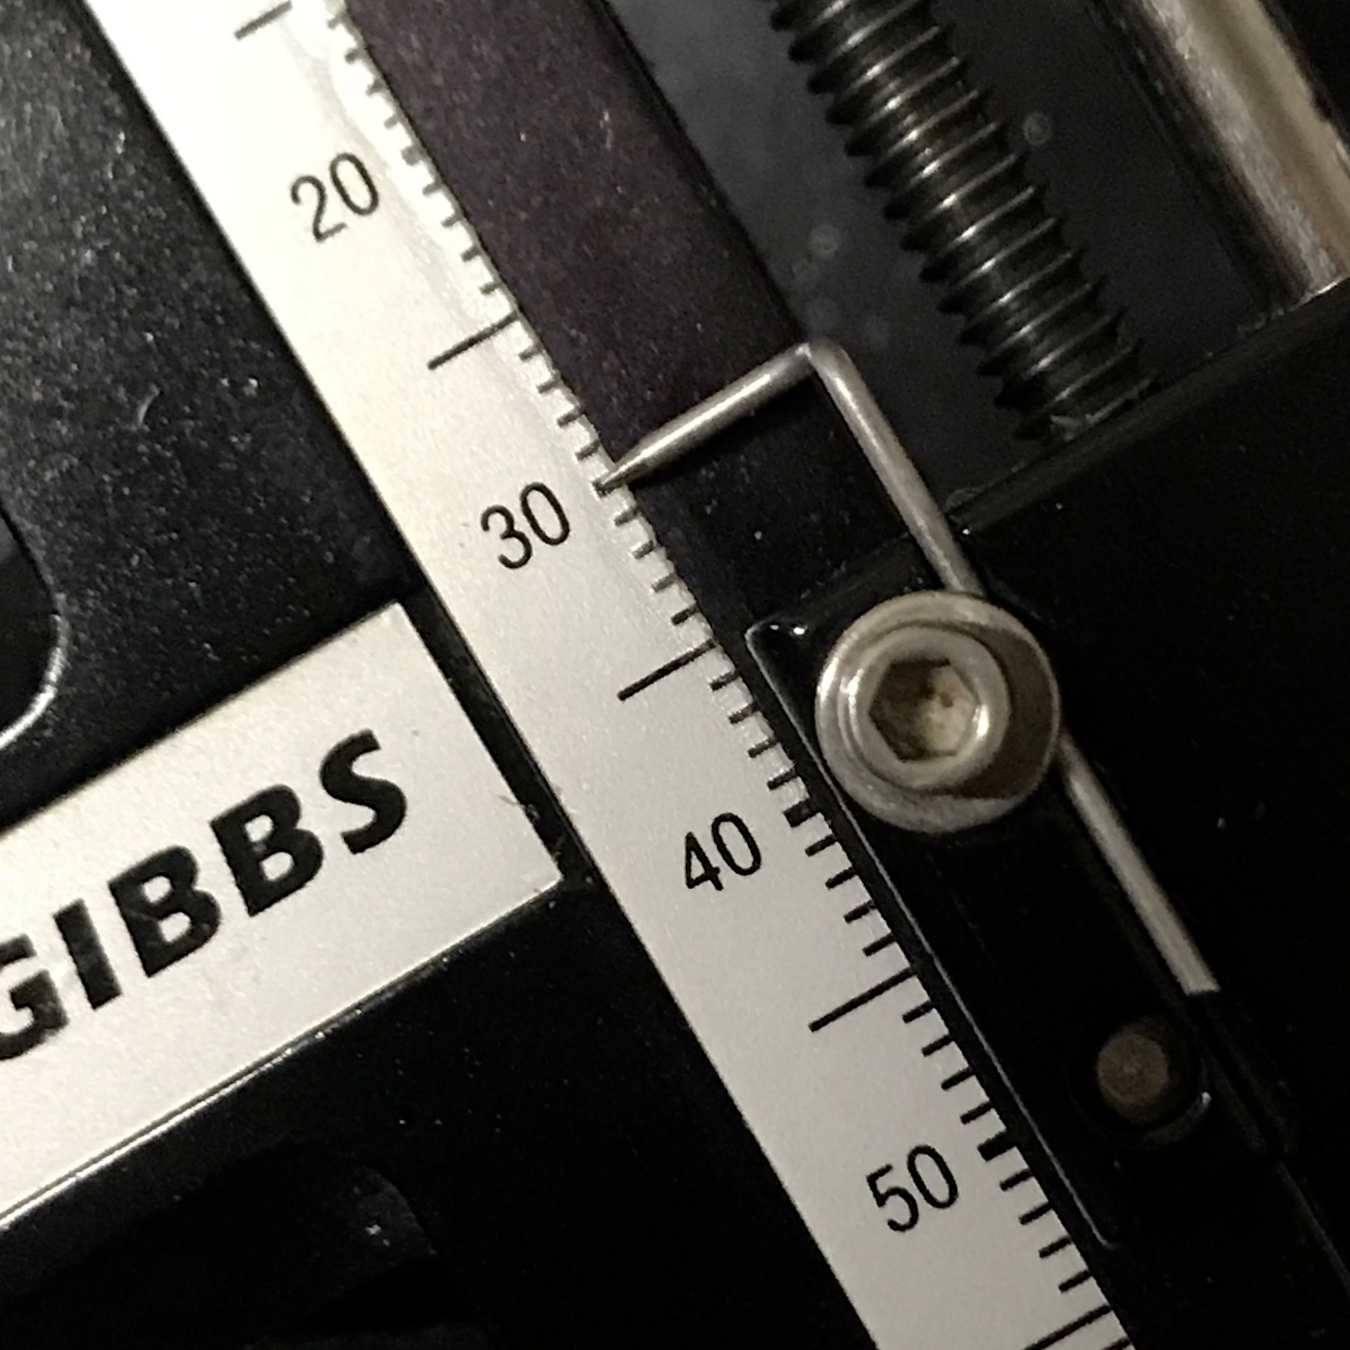
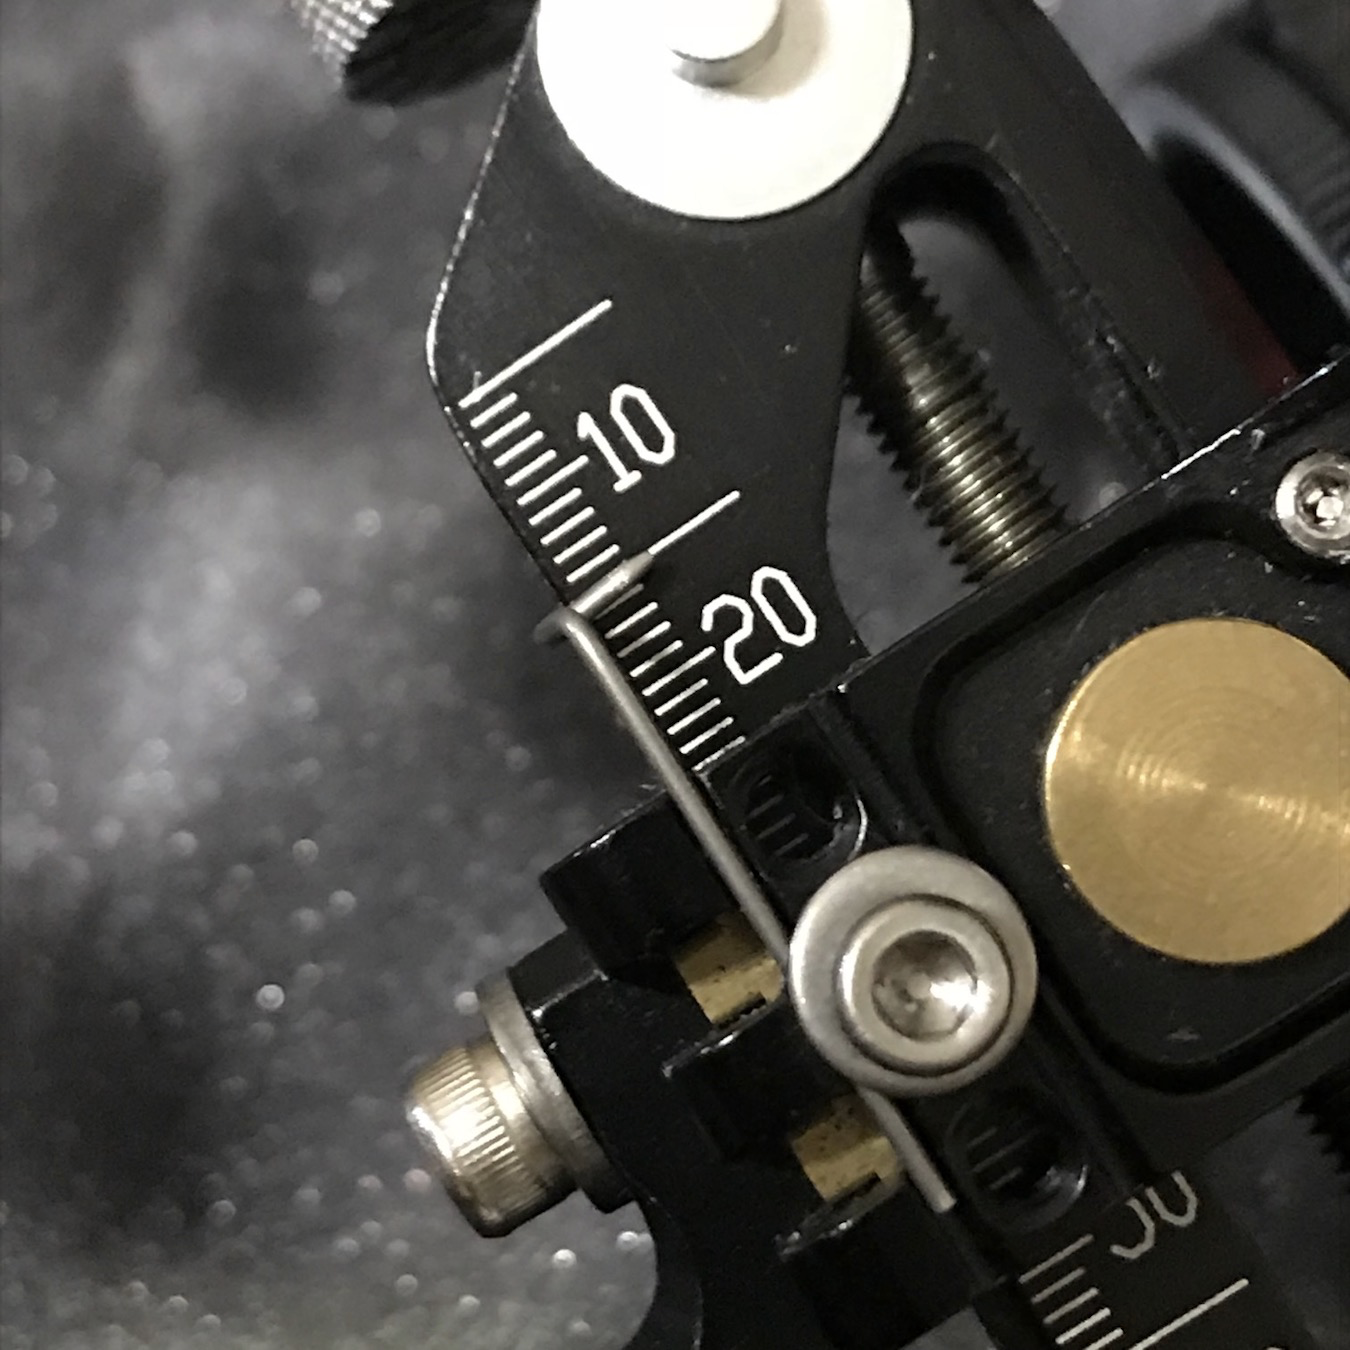
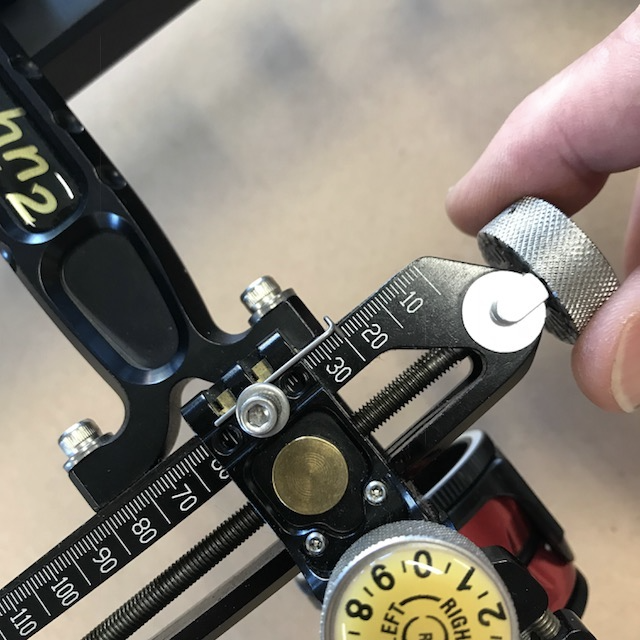
Examine the two sight scale pictures closely. What's the difference between the two scales, other than the obvious..one is laser engraved and the other is mylar? Time's up. It's the mark "thickness" that's different. The mark thickness varies from sight to sight and can even differ on the same scale. The SureLoc mylar scale has three different mark thicknesses. The "ones" marks (1 through 4..or any mark between a mark ending in a 0 or 5) are three clicks thick. The "fives" marks are five clicks thick. The "tens" marks are seven clicks thick. On the Copper John laser scale, all marks are three clicks thick. You should check your own sight to see what your manufacturer decided was the correct mark thickness.
Mylar Tape Marks
3, 5, or 7 clicks thick
Laser Engraved Marks
all 3 clicks thick
OK, so why does all this matter? If you happen to be farsighted and don't (or refuse to) use contacts or readers, think how challenging it's going to be dropping the pointer exactly at the center of a given mark. Even with good close vision, you have a 1 in 3 chance of centering your mark on the laser engraved sights. If you have the SureLoc style mylar, your chances are 1 in 3 for a ones mark, 1 in 5 for a fives mark, and 1 in 7 for a tens mark. If you like those odds, then there are lots of archers who will be happy you're content being 2 or 3 clicks "off" on a 40 yard plus target and drop some points.
Also difficult to comprehend is how you get shot in marks with the AA method? It's not like you're zeroing the vertical knob to "0 "then sliding to a known mark. When sighting in a new mark at a new distance, you don't know where you'll start or where you'll end up. You must count clicks back to a mark center, then convert the clicks to a dial number.
Initial experiencs and frustration with the AA method and a SureLoc sight, led to the development of the Mark+Click method. Ignore the numbers on the vertical knob. Slide the sight to the Mark. Jog the vertical adjust knob forward and back until the block seats in the threads. Exactly line the pointer to the Mark center, clicking as required. Click forward the +Click amount of clicks. Sighting in for a new mark at a new distance and recording a shot in mark is just as easy. Sight in, adjusting as required. Click back to the mark above the pointer; counting clicks until the pointer centers the mark. The clicks back to the mark center is your +Click count. Simple, consistent, and very repeatable.
Calculate Velocity From Marks
If you want the most accurate sight marks, you MUST use the velocity from marks calculation. Period.
A velocity based on the IBO rating of a bow is an estimate. The IBO number itself is subject to the bow manufacturer's marketing department.
A velocity from a chronograph is also just an estimate...unless the chronograph used exactly matches the one used to calibrate the app algorithms. In all likelihood, your chronograph will differ by up to 3%, plus or minus. If your chronograph is off by even 1%, that's 2.8fps for a bow that shoots at 280fps.
Collect the info you need from manufacturer websites, then configure your equipment...sight and arrow.
NOTE: when the app asks for Shaft Length, this is shaft material only...end to end of the shaft tube...no nock, no nock bushing, no point insert.
When you've finished configuring..save everything in a User Record, so you can easily reload and so you don't have to go through the data entry process each time.
For creating sight marks the only things that are critical to get right are Peep Height (PH), Sight Radius (SR), Clicks Per Mark (CPM), Click Value (CV), and the arrow definition...and two solid shot in sight marks. PH & SR will give you the sight geometry for your ultra-close marks, the CPM & CV will give info to calculate velocity, and the arrow def will create a drag model for the calc to use.
PH and SR measurements allow the app to use the sight geometry to establish a High Pin (HP) or point blank distance for your setup. HP is defined as the distance where that pin only works at one distance. All other pins or marks will work at two distances; one ultra-close (IE: closer than the HP distance) and one far.
PH and SR must be taken at full draw and should be as accurate as you can measure. PH is center of peep to center-line of the arrow. SR is center of peep to the pin or scope lens.
Since both measurements need to be taken while the bow is at full draw, it's probably a good idea to have someone help you. You could use a draw board, but, since the draw board doesn't hold the bow the same way you do, your measurements may not be exactly the same as when you draw the bow. You must take the PH measurement with an arrow on the string, so make sure you do this in a safe place.
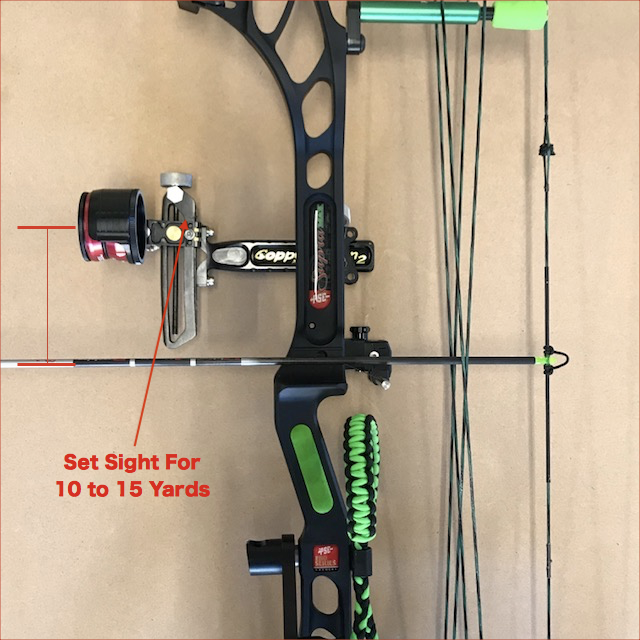
If you don't have a helper, an approximate measurement of PH can be made by using your front sight. To do this, set your sight as if you were going to shoot 10-15 yards/meters. Put an arrow on the string (don't draw). Measure
vertically from the center line of the arrow to the center of the scope lens or aiming point. If you use a drop-away rest, make sure you take the measurement with the rest in the up position.
Estimate Peep Height
Estimate Sight Radius
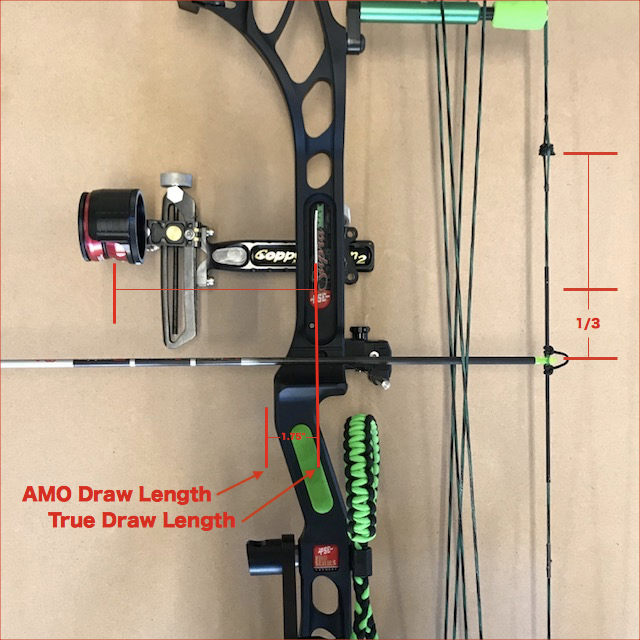
If you know the AMO Draw Length of your bow, SR can also be estimated. True Draw Length is AMO Draw Length - 1.75". Take your True Draw Length measurement, add however many inches your sight extends beyond that point, then
subtract 1/3 of the nock to peep measurement. Remember this measurement will be close but it will still be an approximation.
PH and SR values will most likely change from setup to setup, unless the bows are identical. Small changes in bow geometry and string angle will directly affect both measurements.
Keep in mind, if you guess or estimate your PH and SR, you might get a good set of marks or gaps, but what you'll get for velocity and the ultra-close distances will just be approximations. There are pictures in the Getting Started section on how to properly measure.
Record the sight setting from the MFG supplied sight scale as a Mark+Click(s) value. The MFG Scale is either a mylar tape or laser engraved marks, much like a ruler. Mylar tapes can be stretched when applied, so it is best to check that they reflect a true scale.
Each line on the scale is a "mark". For most sights, the distance from one mark to another is one full revolution of the vertical adjust knob. One full revolution is a certain number of clicks. For most sights there are 20 clicks from one mark to the next. On other sights there are 10 clicks and still others have 8 clicks. The number of clicks in one full revolution is your CPM number.
Most sights number the marks as a ruler would be..at the 10th mark is a 10 at the 20th mark is a 20. Shibuya does the same but drops the trailing 0..so 10 becomes 1 and 20 is 2, etc. There are still 10 marks between the numbers regardless of whether they end in a 0 or not.
Your "mark" value is the mark less than the sight's yardage pointer for the sight in distance. Say your 30 yard sight mark is just past the "25" mark on the MFG Scale (IE between marks 25 and 26). Turn the sight's vertical adjust knob so the yardage pointer moves back to the 25 "mark" on the dial, counting the number of clicks it takes to get there. The Click(s) value is the number of clicks it took to move the pointer back to the center of the 25 "mark".

30yd Mark 25+12
Clicking Back to 25+0
Example: You turn the vertical adjustment knob and count 12 clicks to reach the 25. Your "Mark+Click" (M+C) value would be 25+12.
Click to the Config Sight view. Select the sight from the Sight combobox. NOTE: you should already have done this when you built your user record.
You've collected two or three shot in marks, so enter the data in the edit fields for Near, Mid and Far ranges, as appropriate. Check the calculation pair option(s) you want to use to determine velocity. Checking a selection will replace the Near-Mid, Near-Far, Mid-Far labels with the ranges you've entered in the edit fields.
What the app is doing while calculating, is trying to find a velocity to match the trajectory of your marks and sight geometry. If your marks are "off" a little it will show up as a discrepancy in the velocity results...either plus or minus a few feet (or more) per second.
Some people use 2 marks to calibrate marks to velocity. With 3 marks, you can find marks that are off or not as good as they could be. Unless you are really confident in your 20 mark, a close mark of 25 or 30 is usually always better. You can be off multiple clicks at 20 and still hit a Vegas sized X. Your first mark is the anchor and is a reference for all you other marks in the calculations. If your first mark is "s#!+y", your resulting velocity will reflect that.
NOTE: You can use a 20 & 50, but generally, a 30 & 50 will give better results as a 20 mark is too easy to get "close enough". To see what is meant by "close enough", try changing the 20 mark you have by 2-5 clicks to see how it affects the results at distances other than your sight in marks. 2-5 clicks at 20 just moves you around a Vegas X-ring but those same 2-5 clicks have a negative impact and skew calculated velocity. But since you aren't using a 20..that's a good thing. ;-)
Using multiple shot in marks is a good way to validate marks. The cross checking feature enhances you ability to filter out "bad" marks.
Try this... Get a solid 25, 45 and 65 (or 80). Enter all three distances and the M+C values in the Near, Mid and Far edit pairs. For the 1st pass, uncheck the Mid-Far edit pair. Let the app calculate your velocity from the Near-Mid and Near-Far pairs. Running the calculation will display the two velocities. The Apply button will fill the mark list data sheet. Find your Mid Range mark in the list. Does the M+C agree with your Mid Range sight in mark? If so, you're done. Save the user record and start using the mark list.
If the Mid Range mark is off and you were hitting a 1/2" line at that range, you can fine tune the mark list datasheet by adjusting the Fletch Offset amount. If your shot-in Mid Range M+C from is less than the M+C in the mark list, increase the fletch offset. Re-run the velocity calc. Click back to the mark list and check the M+C for your Mid Range. You should see the table adjust until your Mid Range mark is "on" or closer. Your short marks should also be OK at this point.
Anchor Range
What Is an "Anchor Range". Simple answer is it's a quick way to shift all marks in the mark list data sheet around a single shot-in mark. It equates to manually loosening the sight tape pointer nut on your sight and adjusting the pointer a yard or two on the sight tape. So the Anchor Range and Anchor Mark+Click entries are for when you need to globally change ALL your marks a certain amount.
Say you sight in one day and you've shot in two distances to establish a velocity for your setup. All is good. Marks+Clicks are all spot on. Then the next day you go to the range, set your sight for a distance from the marks list, but it's off by three clicks. You know nothing has changed with the setup..but now, all entries in the data sheet are going to be "off" by three clicks at every distance. The distance you just shot and noted a click difference in is the new "anchor" range, while the Mark+Click used for the shot is the new "anchor" Mark+Click. Enter the Anchor Range and the Anchor Mark+Click and press the Change Anchor button. All the marks in the data sheets will be adjusted to the new "anchor".